Chimney Systems
30 Degree Thru Wall Chimneys
What is it?
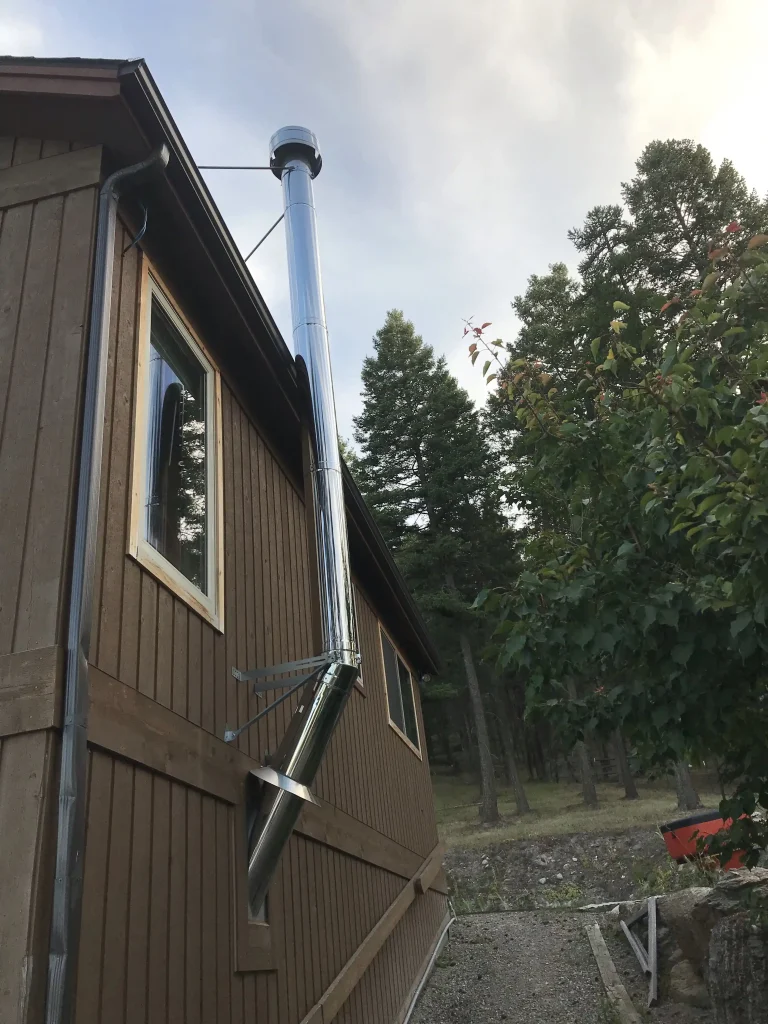
A 30 degree through the wall installation is one where the stove pipe elbows out through a wall at 30 degrees. A 30 degree wall thimble is installed to minimize radiant heat transfer of the class A chimney which is running at 30 degrees through the wall. A 30 degree elbow replaces the tee. The chimney then continues vertically up the side of the structure. This unique design allows the chimney to extend up to 14″ from the exterior wall, bypassing most overhang clearance issues.
Pros and Cons
How Difficult is Installation?
Difficult. Approximately 14-18 hours for users with little experience, 8-10 hours for users with advanced construction knowledge (chimney enclosure, additional levels, or offsets = additional time).

Other Considerations
With 30 Degree Through the Wall installations, you first need to consider where the exterior chimney will exit the structure. What is the exterior wall constructed of that the wall thimble will install into? If it is framed, will you clear the studs or will you have to cut a stud? Is it a load bearing wall? If not, it will require additional framing. Is there anything on the exterior such as windows, powerlines, or overhangs where the chimney will attach to the side of the structure? If you live in an area where you receive heavy snowfalls, where will the snow from the roof slide too? If your chimney is on the downhill side, you should consider another location or use a snow break device to keep the chimney from being knocked over.
On multi-story applications, make sure you have secure places to mount the support brackets to carry the weight of the chimney, which can be several hundred pounds. Your chimney must be a minimum of 2′ higher than anything within 10′ of it.
Wall Thimble Installation. The wall thimble is designed to prevent heat transfer into the combustible exterior wall. It also stabilizes the chimney, provides a transition between stove pipe and Class A chimney, and seals out the exterior weather. The wall thimble is designed to fit between wall studs which are 16″ OC. It is one of the most critical components in the assembly and must be installed properly. If you are passing through a non-combustible wall (like concrete), you will need a core driller to punch out a large hole. If the wall is cinder block or brick, you can carefully remove the material by drilling small holes in the shape of the diameter of the chimney, then remove the material with a hammer and chisel. In this type of installation, your wall thimble can be a steel tube which is mortared into the masonry wall.
Wall Brackets. Wall brackets are used to stabilize the chimney side to side, and some are also capable of carrying a vertical load. In multi-story applications, additional vertical support is required in addition to the tee support. These should be attached at the rim joist at each story, which is essentially floor level, as this area offers plenty of material to attach to.
Soffits and Overhangs. Soffets and overhangs extend the roof line past the side of the structure. If yours do not extend further than 14″, you can project past the overhangs without having to cut or modify the fascia, gutters, or soffits. Overhangs that extend 24″ or greater are fairly easy to penetrate, without dealing with fascias or gutters. Some people choose to use offsets here and extend past the overhang, but this creates cleaning and support issues because there is nothing to support the chimney above the offsets.
Extended Chimney Support Brackets. Your chimney system must terminate no lower than 2′ above anything within 10′. This can put the chimney pretty high above the fascia of the structure of a roof with a steep pitch. These brackets act like tripods and stabilize the chimney against high winds.